
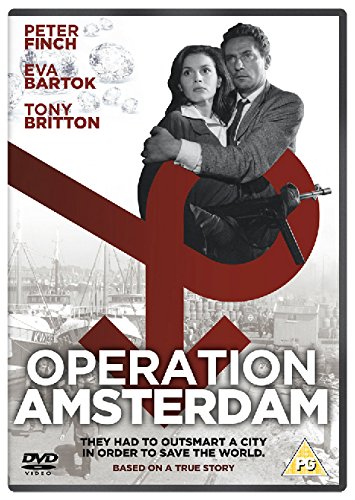
Operation Amsterdam
Date: 1959
Director: Michael McCarthy
Production Company: The Rank Organisation, Maurice Cowan Productions
Stars: Peter Finch, Eva Bartok, Tony Britton
Location(s): London, Noord-Holland (Netherlands)
Region(s): London O-Q, Netherlands
Storyline:
It is 1940, and the German invasion of the Netherlands is under way. A British officer and two Dutch diamond merchants travel to Amsterdam. Helped by local civilians, and shadowed by a fifth-columnist lieutenant who is determined to frustrate their plans, they race against time to gather the Dutch stocks of diamonds, and take them to England before the city falls to the advancing German army. Based on the book ‘Adventure in Diamonds’ by David E Walker.
Additional Information:
Screen captures and uncredited now shots by Phil Bailey
During Phil’s research for the film he found contemporaneous newspaper reports concerning the filming in Amsterdam and the creation of “Amsterdam in a corner of Pinewood”. Re: Captures 30, 37, 59 and 60. These can be read by clicking here.
The Royal Netherlands Navy destroyer Piet Hein, formerly HMS Serapis, played the part of the British destroyer.
Jimmy Snow worked on special effects at both Pinewood and Denham Studios but a name that often remained uncredited, as with this film. An interesting Biography and her Memories of him has been written for us by his granddaughter Brigitte, all of which can be read here.

As an Amazon Associate, we earn from qualifying purchases.
Can you help:
If you have any information regarding this production, the locations or, even better, some comparison shots please contact us. Images submitted must be in Landscape orientation, as would be seen on the cinema screen, not Portrait.
We are aware that there are films on the site that were added when the criteria for the inclusion of locations was very different from today and, as a result, there may be scenes missing from some productions. Please do not forward additional screen captures to us but bring the detail to our attention, for we do, and are, 're-addressing' these older entries as time allows.
- Capture 1
- 30 Apr 2018

A car arrives at an address in London. Emery Hill Street SW1, at the junction with Rochester Row.

Originally a hostel for students of King's College Theology department, the building opposite now houses the Grange Wellington Hotel.
- Capture 2
- 30 Apr 2018

Major Dillon (Tony Britton) makes his way into the building. Emery Hill Street.

W G Walkers has been replaced by an interior design firm.
- Capture 3
- 'Now' required

In the early morning half-light, the team are driven to join a British destroyer.
- Capture 4
- 18 Feb 2020

They are picked up from the destroyer and landed at IJmuiden. A view west from the end of the Trawlerkade, with the Lage Vuurtoren on the right of the shot.
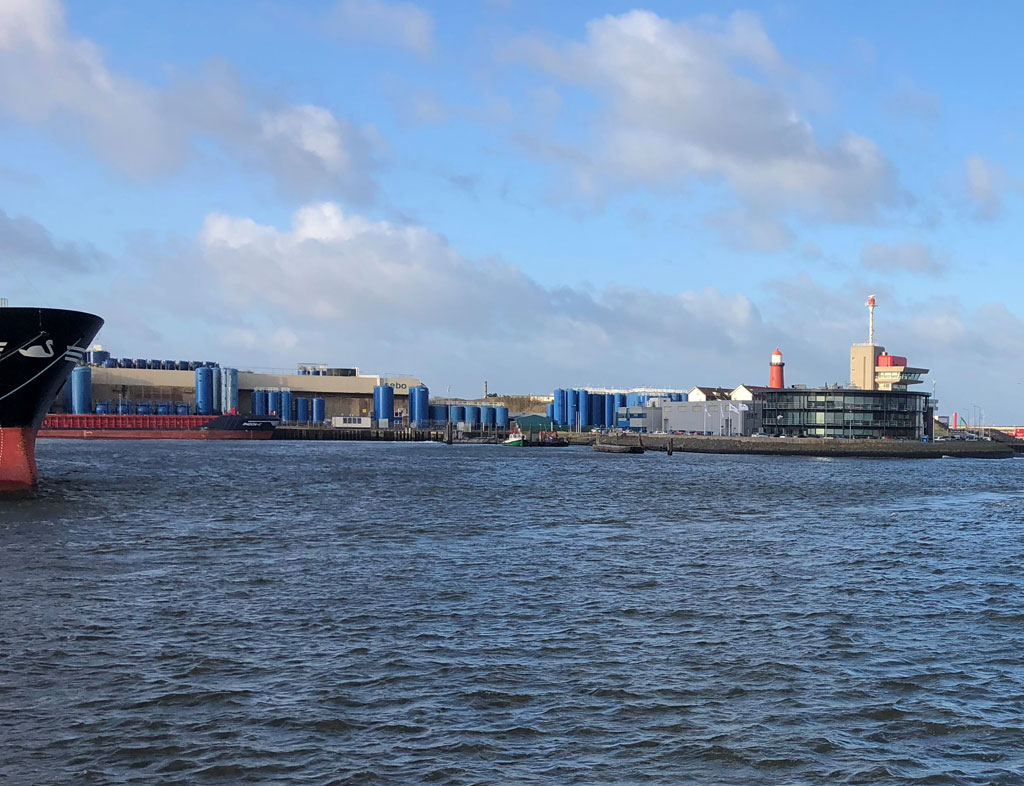
Frank tells us that this is the same as capture 63: Here, looking at Forteiland at Ijmuiden. The original shot indeed has been taken from Trawlerkade but nowadays you cannot take the photo from that position because there are too many new buildings. This photo has been taken from Hallkade and gives almost the same view. To the right can be seen the light house called: Lage vuurtoren van Ijmuiden. (RL)
- Capture 5
- 09 Jan 2021

As they land, bombs are falling. A view southeast on Trawlerkade.
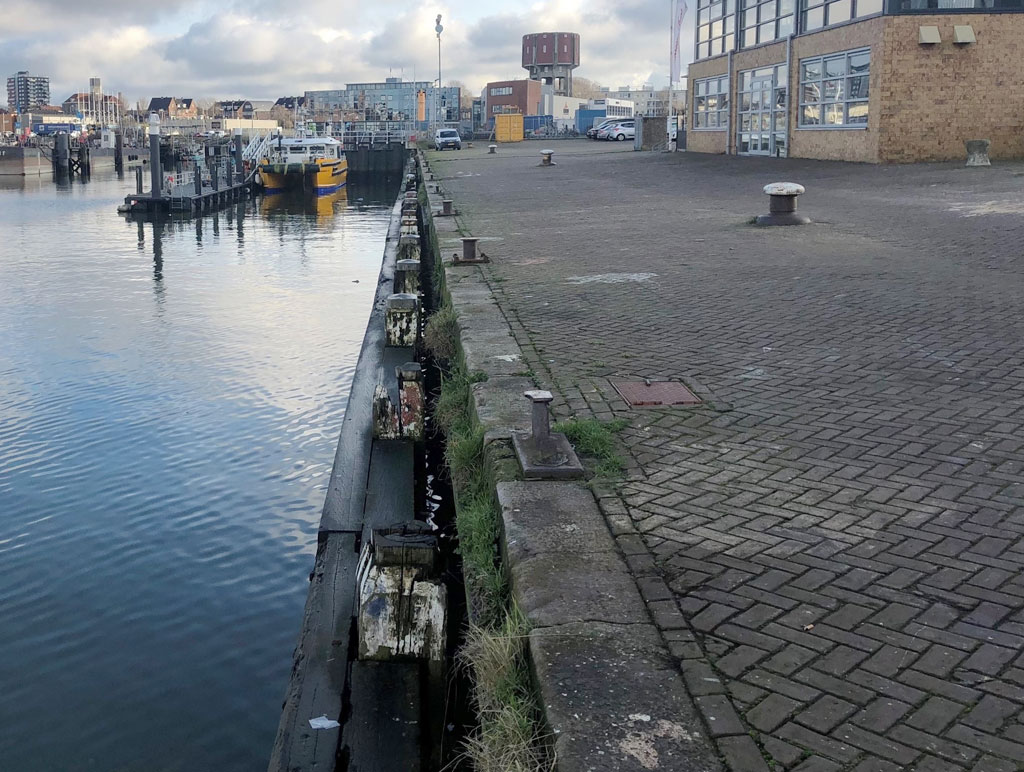
Fortunately for Frank in 2021 there are no casualties on Trawlerkade.
- Capture 6
- 'Now' required

They are stopped by a nervous Dutch police officer with a pistol. Jan Smit (Peter Finch) and Dillon, with the top of the Hoge Vuurtoren behind.
- Capture 7
- 'Now' required

The policeman (John Bailey) suspects that they are fifth columnists; they ask to be taken to the port commander. Trawlerkade.
- Capture 8
- 18 Feb 2020

Dillon, Smit and Walter Keyser (Alexander Knox) follow the policeman to the port commander's office.
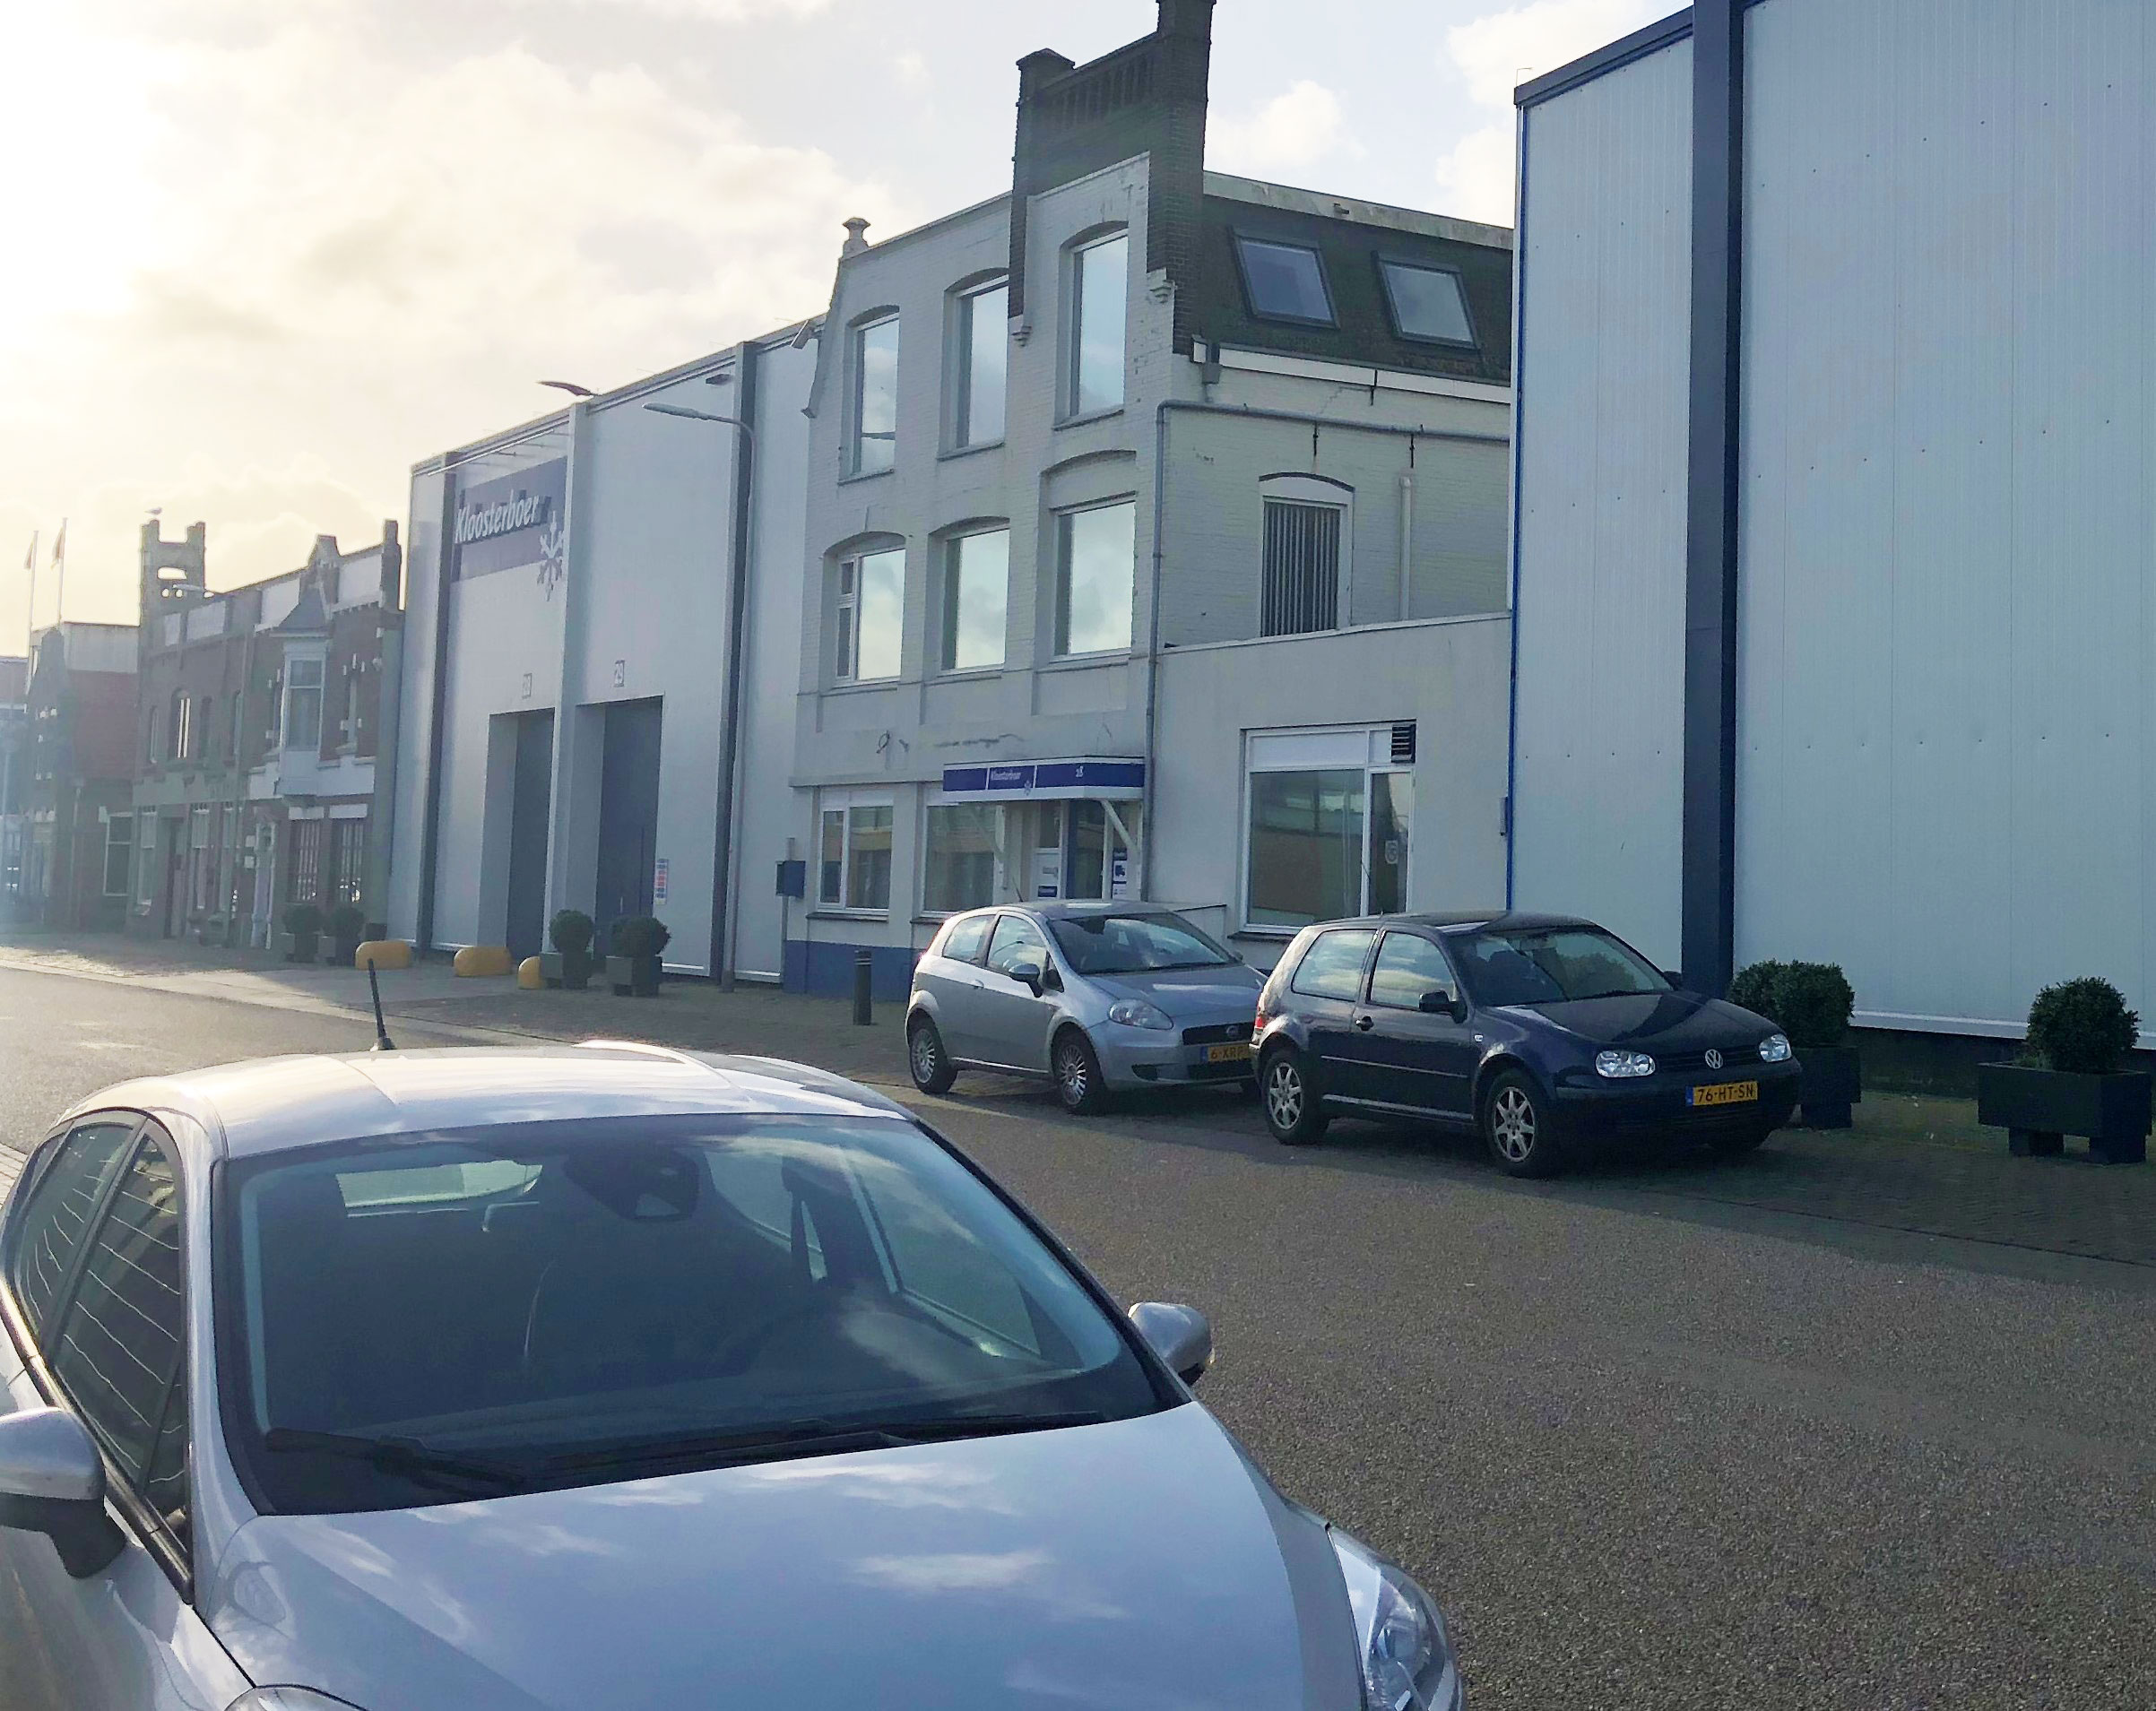
Frank says that the house on the back is situated on Trawlerkade 28, Ijmuiden. The only information that Frank has about the building now is that an international forwarding compan is situated here. (RL)
- Capture 9
- 20 Feb 2020

After contacting the port commander, the group are trying to find a car that works, to get to Amsterdam. A Mercedes forces its way through the crowds of refugees towards the edge of the quay. This is further southeast on Trawlerkade, at the junction with Eerste Havenstraat.
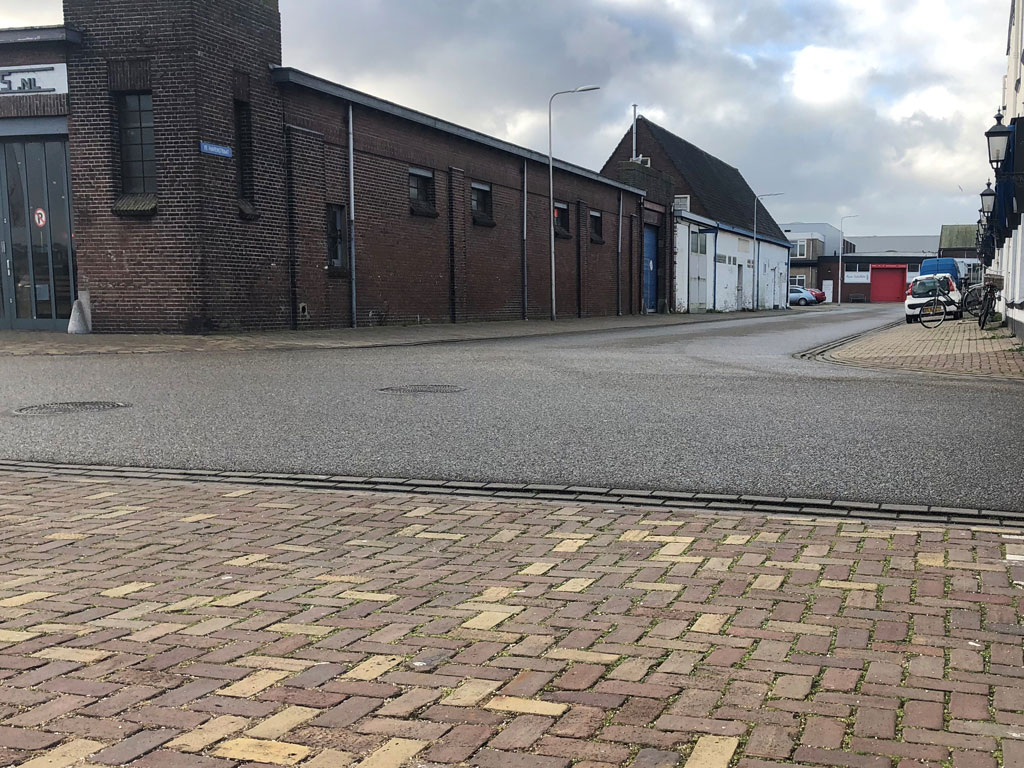
In the background can be seen Trawlerkade 82 at the junction with Eerste Havenstraat in Ijmuiden. Nowadays the wholesale of ship supplies and fishing items is located on that location. Thank you Frank. (RL)
- Capture 10
- 18 Feb 2020

The car is driven by Anna (Eva Bartok), intent on suicide. Jan Smit stops the car in the nick of time.
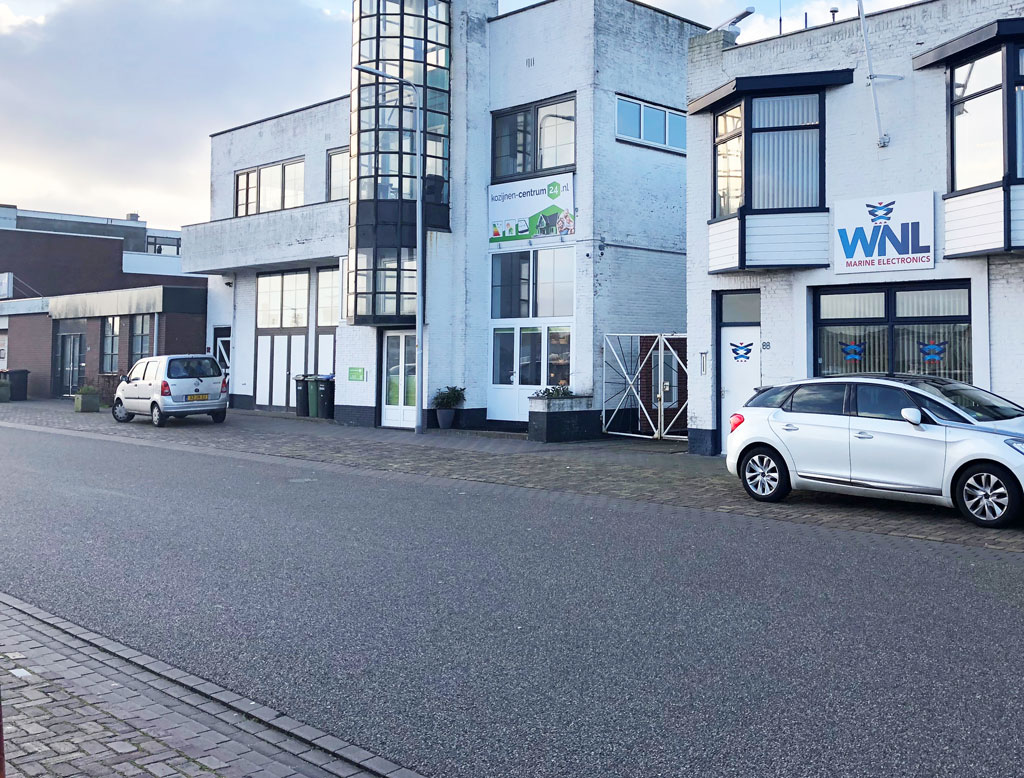
Frank once again provides the shot and the detail that the white house on the back is situated on Trawlerkade 92, Ijmuiden and obviously still exists. The house was constructed in 1931 and belonged to the Ijmuider Federatie (Labour and Fishing Company). For that time a very modern building. (RL)
- Capture 11
- 09 Jan 2021

Anna has agreed to drive the group to Amsterdam, but they are stopped at the port exit by the same policeman. Southeastern end of Trawlerkade.
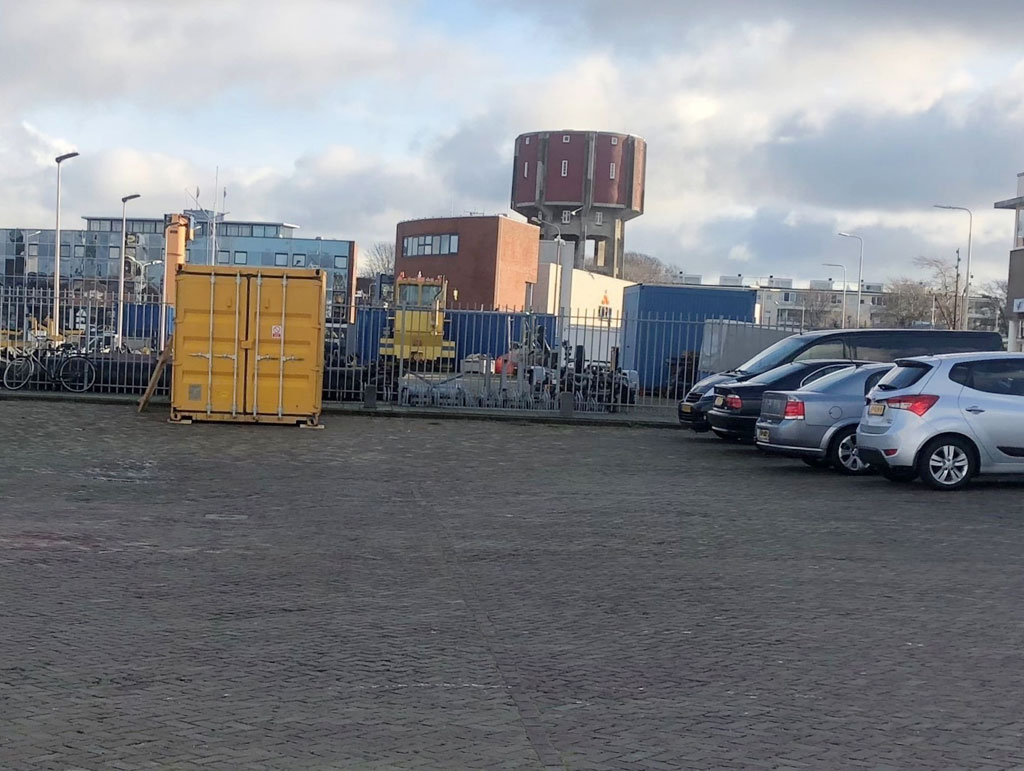
The first time Frank was here the water tower on the background was being renovated and not visible. Obviously the renovation from this monument from 1915 is finished now. (RL)
- Capture 12
- 18 Feb 2020

Anna's military pass has got them past the policeman, and they are en route to Amsterdam. Molendijk on the Beemster Polder, just south of the junction with Molenweg, between Schermerhorn and Ursem.
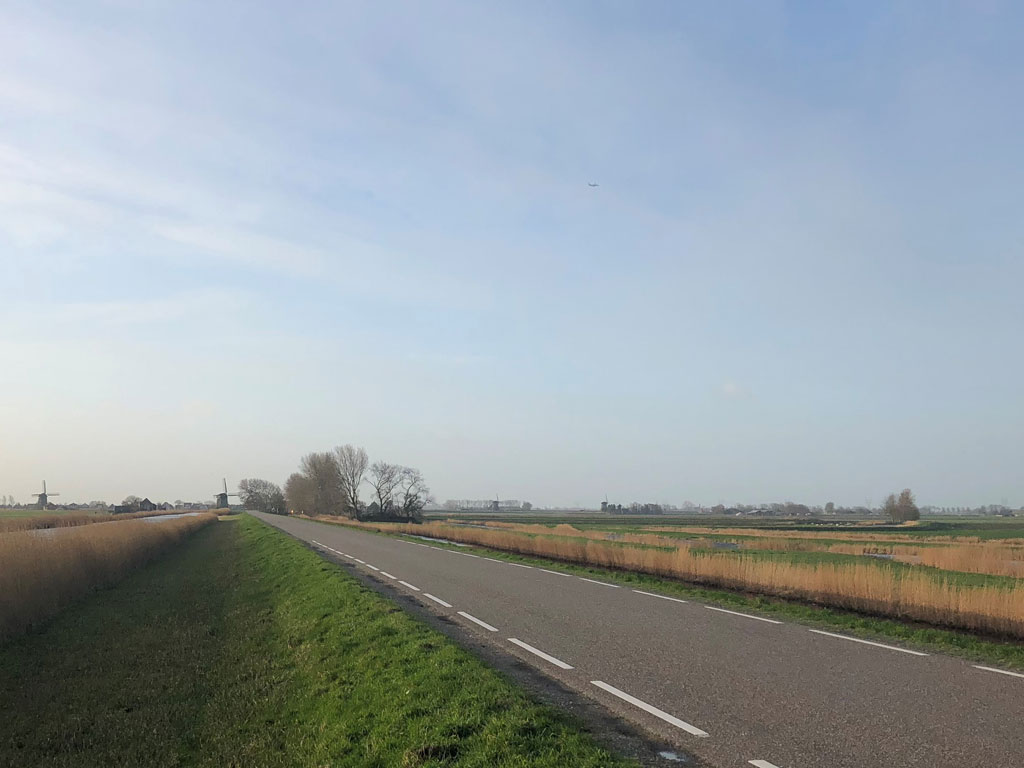
Frank van den Berg took this photo on the intersection of Molenweg and Molendijk between Ursem and Schermerhorn. Schermerhorn you can see right in front. Two windmills can be seen, one is called Ondermolen K and the other is called Bovenmolen G. (RL)
- Capture 13
- 'Now' required

Driving fast and trusting no-one, they force their way past a checkpoint at a bridge.
- Capture 14
- 'Now' required

In back projection, they speed away from the checkpoint.
- Capture 15
- 29 Jul 2018

Entering Amsterdam, they pass the Ceintuur Theater on Ceintuurbaan. The building now houses a restaurant.

The impressive concrete façade today.
- Capture 16
- 29 Jul 2018

Soldiers search a civilian outside Ceintuurbaan 236.

A burger bar today, with delivery bikes.
- Capture 17
- 29 Jul 2018

Heading west on Ceintuurbaan, approaching Hobbemakade, they have their first sight of the Pierement that will feature repeatedly through the film.

A more cluttered view now.
- Capture 18
- 29 Jul 2018

They cross a bridge from Eerste Jan Steenstraat onto Hobbemakade . . .

Little change here.
- Capture 19
- 29 Jul 2018

. . . and head north on Hobbemakade, past the junction with Cornelis Anthoniszstraat.

Today. Viewed from Ruysdaelkade.
- Capture 20
- 29 Jul 2018

They approach the offices of J K Smit and Sons, Diamond Merchants, at Keizersgracht 804.

Keizersgracht 804 was clad in scaffolding and netting on this occasion, View west with portable toilet.
- Capture 21
- 29 Jul 2018

Later, joined by Jan's father Johan Smit (Malcolm Keen) they make their way to the Alpha Club to consult other diamond merchants. Nieuwe Doelenstraat, looking northeast toward Kloveniersburgwal.

A ground-level shot.
- Capture 22
- 29 Jul 2018

They leave the Alpha Club. The nameplate is clearly a prop, as it's moved since they went in.

These look like the same doors, 60 years on. The building now houses the Faculty of Humanities of the University of Amsterdam.
- Capture 23
- 29 Jul 2018

Returning to Keizersgracht, they find a military patrol outside. View west to Utrechtsestraat.

Parked cars and skips. The bridge is just visible.
- Capture 24
- 29 Jul 2018

Britton tells Anna to drive to Vijzelstraat. Though very distinctive, this doesn't match Vijzelstraat. Ah, here we are -- Roetersstraat looking north across the Halverstadbrug at Nieuwe Achtergracht. The building on the right of the shot has gone, replaced by a modern block belonging to the University of Amsterdam.

The old and the new...
- Capture 25
- 'Now' required

On their way, they see more signs of the fear of fifth-columnists.
- Capture 26
- 29 Jul 2018

Passing a distinctive building. The turbine hall of the power station on the corner of Geschutswerf and Hoogte Kadijk, seen from Sarphatistraat.

Completely obscured by trees from the original viewpoint. This shot is from a little closer.
- Capture 27
- 29 Jul 2018

Street fighting. The junction of Alexanderkade and Alexanderstraat.

Little change in this quiet residential street.
- Capture 28
- 29 Jul 2018

'These are the people who stay to fight', Anna tells them.

The northern corner of Alexanderplein, just west of the Muiderpoort. The Tropenmuseum is visible in the background.
- Capture 29
- 29 Jul 2018

They pass the Muiderpoort.

Not much has changed here apart from the road layout.
- Capture 30
- 'Now' required

The car arrives at the Flower Market. This is a set at Pinewood Studios. For further detail and information regarding the set see the link in the Header Section.
- Capture 31
- 15 Apr 2020

Dillon, on a separate mission of his own, carries two important suitcases to an appointment with a local resistance group. He's just emerged from Wijngaardstraatje into Oudezijds Voorburgwal.
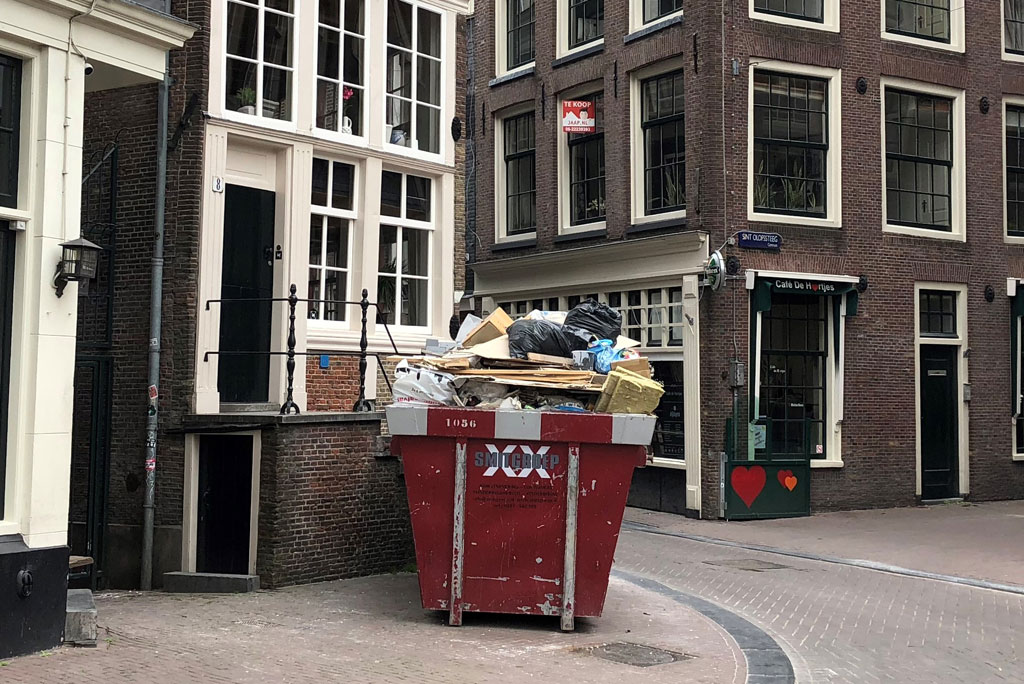
Frank provides a replacement shot for mine that was off angle. What a pity about the skip, but it could have been scaffolding.
- Capture 32
- 29 Jul 2018

He walks down Oudezijds Voorburgwal to the Armbrug.

Also seen from the opposite direction in 'Modesty Blaise'.
- Capture 33
- 29 Jul 2018

He discovers that he's been followed by a soldier in Dutch army uniform, who has shot at him and now advances cautiously to try and locate him. View over Armbrug to Oudezijds Armsteeg.

Far more bicycles chained to bridges today.
- Capture 34
- 17 Oct 2017

After a fight, Dillon drops his assailant, now rendered unconscious, into the canal. Vredenburgerbrug crossing Oudezijds Achterburgwal. An almost identical view is seen in 'Puppet on a Chain'.

The same location in an image borrowed from 'Puppet on a Chain'. (PW)
- Capture 35
- 29 Jul 2018

This looked at first like a narrow alley, but it's number 2 Oudezijds Achterburgwal, with a truck parked close in front. The same location is seen again in capture 53.

The view from the correct angle is obstructed today, but this isn't far off.
- Capture 36
- 'Now' required

Meanwhile Anna is driving Walter and Jan through the city. Anna notices that they are being followed.
- Capture 37
- 'Now' required

They enter a square, and Jan and Walter hastily leave the car and conceal themselves. The Pinewood set again. For further detail and information regarding the set see the link in the Header Section.
- Capture 38
- 29 Jul 2018

Anna drives on, drawing the following car into a pursuit. She passes the Nieuwekerk heading into Eggertstraat...

Complete with delivery truck that just beat me to it.
- Capture 39
- 29 Jul 2018

...and across in front of the Royal Palace with tyres squealing.

Not much change here, of course.
- Capture 40
- 01 Jun 2020

The pursuing car catches air as they speed east along Groenburgwal, crossing Raamgracht.
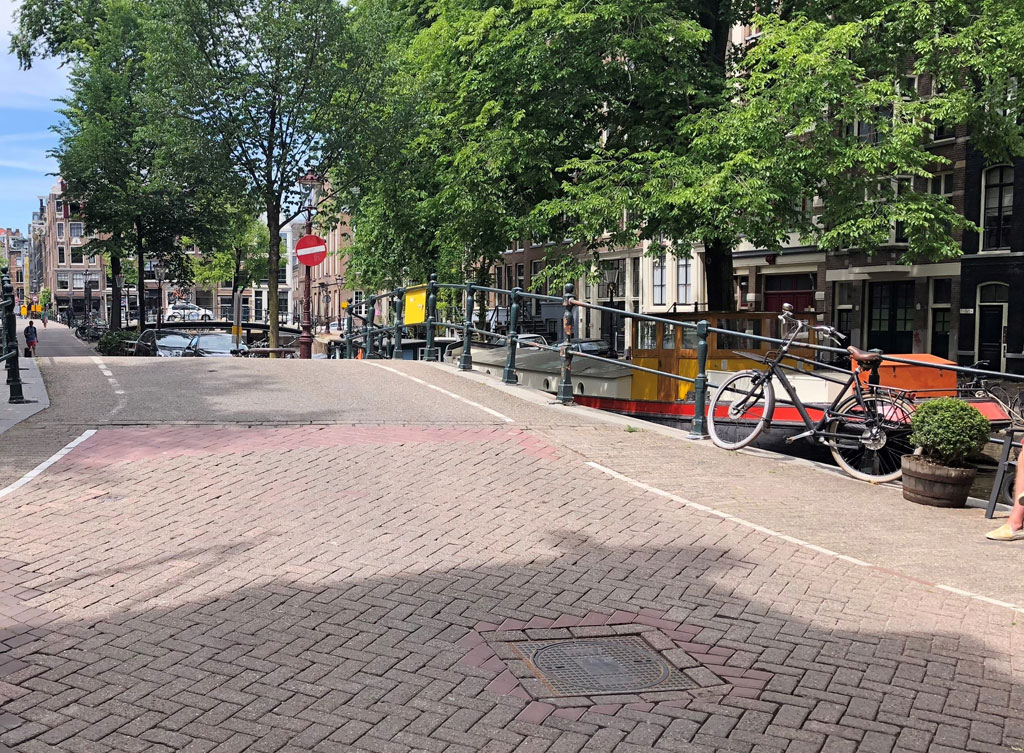
Frank found that since 'Operation Amsterdam' ended it has become much more quiet in this neighbourhood. No more flying cars. Only bikes. (RL)
- Capture 41
- 10 Mar 2020

Over a bridge. Haarlemmersluis, linking Haarlemmerstraat to Nieuwendijk.
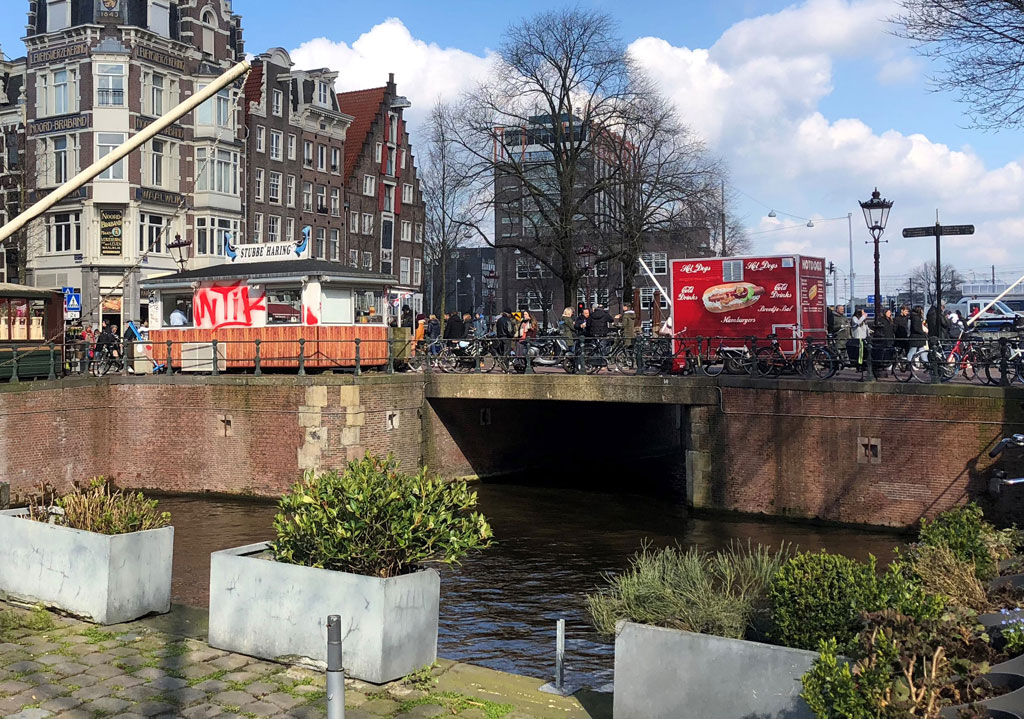
Frank confirms the location as the Haarlemmersluis that connects the Haarlemmerstraat with the Nieuwendijk, Amsterdam. On the left, the building on the corner of the Haarlemmerstraat (number 2 it is) used to bethe offices an insurance company, Levensverzekeringen Noord Brababant Waalwijk. The building has been restored beautifully in 2014. (RL)
- Capture 42
- 29 Jul 2018

Southeast on Prins Hendrikkade, past the Amrath Hotel.

The magnificent building (the 'Scheepvaarthuis') originally housed the head offices of a number of shipping companies.
- Capture 43
- 29 Jul 2018

Along Prins Hendrikkade, crossing the Kikkerbilssluis over Oude Schans

A ground-level view, with the Nicolaaskerk visible in the background.
- Capture 44
- 29 Jul 2018

Into Schippersgracht, seen from Kadijksplein

The large building on the right of the original shot has gone, allowing a view of the East Indiaman moored by the Maritime Museum.
- Capture 45
- 29 Jul 2018

Across a bridge in front of Schippersgracht. Not Kortjewantsbrug, as I initially thought, but the old Kattenburgerbrug, replaced by the current bridge between 1964 and 1967.

The new, much less ornate, Kattenburgerbrug.
- Capture 46
- 29 Jul 2018

Well ahead of the pursuers at this point, Anna enters Nieuwmarkt from Keizersstraat...

Today, with white van.
- Capture 47
- 29 Jul 2018

...crosses the square in front of the Waag and leaves along Bloedstraat.

Today, with scaffolding and netting. The trees have gone, too.
- Capture 48
- 29 Jul 2018

The lieutenant looks in frustration down multiple possible escape routes. This one is Koestraat, from Nieuwmarkt...

Much the same today.
- Capture 49
- 'Now' required

Previously, and erroneously, identified as Dwars Spinhuissteeg, in fact this is Lange Keizersdwarsstraat. Looking from Koningsstraat, we see what was then then Hotel De Bank at Keizersstraat 2, in view at the end. Lange Keizersdwarsstraat has largely disappeared since the building of the Amsterdam Metro, and a remnant now forms part of an open area between Keizersstraat and Nieuwmarkt Metro station.
- Capture 50
- 29 Jul 2018

Bethanienstraat, from Oudezijds Achterburgwal...

Greenery taking over...
- Capture 51
- 'Now' required

It's taken quite a while to find this one. This is Brandewijnsteeg, looking from Koningstraat, with buildings in Recht Boomssloot visible in the background.
- Capture 52
- 'Now' required

I should have spotted this one much earlier. The view from Nieuwmarkt into Monnikenstraat, with the greengrocer's shop at number 27-29 undergoing renovation.
- Capture 53
- 29 Jul 2018

Dillon has handed over his suitcases and the resistance group set off in a truck. Oudezijds Achterburgwal, seen from the Vredenburgerbrug.

Railings, reflecting the fact that access to parts of this area is now restricted.
- Capture 54
- 29 Jul 2018

Jan climbs from the rear window of a cafe to escape the lieutenant, who has again caught up with him and Walter. Oudezijds Kolk.

The window has become a door, but this is the place.
- Capture 55
- 29 Jul 2018

Jan and Walter run southwest along Oudezijds Kolk.

Now with railings, and bikes chained to them.
- Capture 56
- 29 Jul 2018

Anna, having shaken off the pursuit, is returning to the square. Halvemaansbrug, with the Munttoren in the background. A similar view id seen in 'The Inspector'.

Taken from a canal tour boat, which isn't the right viewpoint but not too far out.
- Capture 57
- 06 Apr 2020
A repeat of Capture 56 as Frank van den Berg took advantage of a very quiet Amsterdam due to the CoronaVirus to provide us with a "now" from the correct viewpoint. (RL)
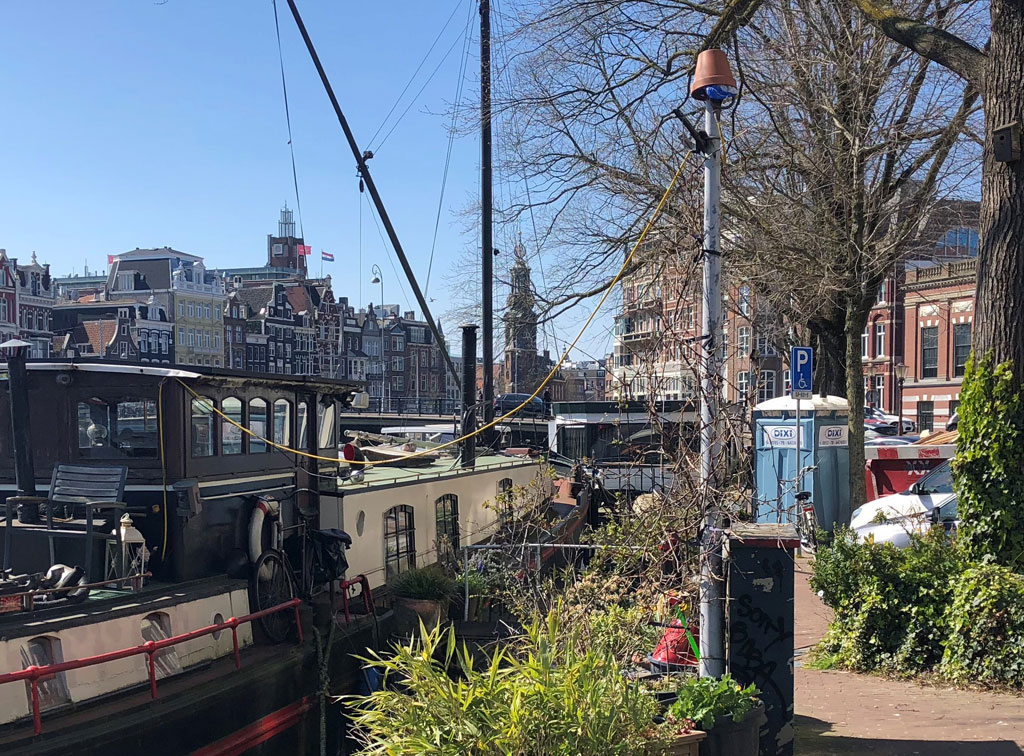
Frank tells us that this is at the junction of the Amstel and the Groenburgwal with greenery and boats having taken over through the years. Interestingly, he says that the river Amstel is where Amsterdam got it’s name from, Amsteldam not sounding that good they called it Amsterdam. (RL)
- Capture 58
- 29 Jul 2018

Thwarted yet again by the lieutenant as they try to leave the offices in Keizersgracht, the group are rescued in the nick of time by troops commanded by Colonel Janssen (John Le Mesurier). Utrechtsestraat at the bridge over Keizersgracht.

More scaffolding, and tram stops.
- Capture 59
- 'Now' required

Back in the square the group, aided by the resistance fighters, are breaking into the safe deposit boxes containing the remaining diamond stocks. The lieutenant arrives with troops and a fierce firefight develops. This is the same set as seen in captures 30 and 37, although some of the buildings have moved. For further detail and information regarding the set see the link in the Header Section.
- Capture 60
- 'Now' required

For completeness, a view in the opposite direction. For further detail and information regarding the set see the link in the Header Section.
- Capture 61
- 18 Feb 2020

The four return to IJmuiden. Beemster Polder again; this is Ondermolen O on the Molenweg at the junction with Molendijk.
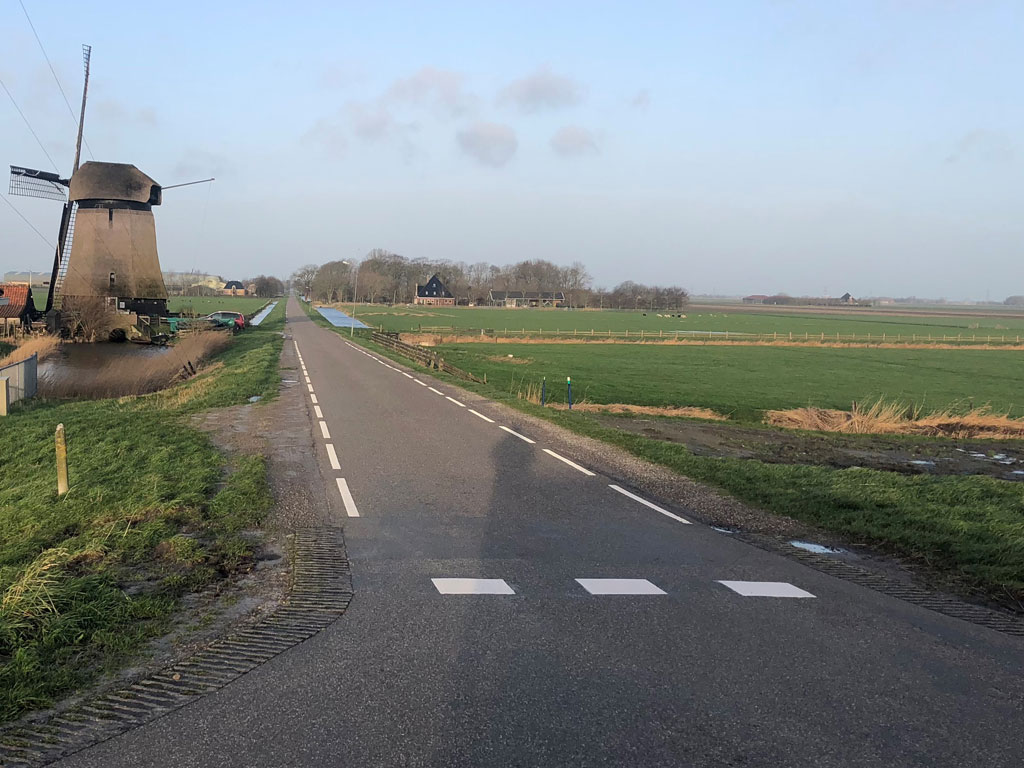
This is Ondermolen O in Ursem and Frank took this photo on the intersection of the Molenweg and Molendijk. Exact same camera location as on Capture 12
- Capture 62
- 18 Feb 2020

On the road, a Messerschmitt begins strafing the refugee column. The group leave the car and take cover. Molendijk, with the village of Schermerhorn ahead.
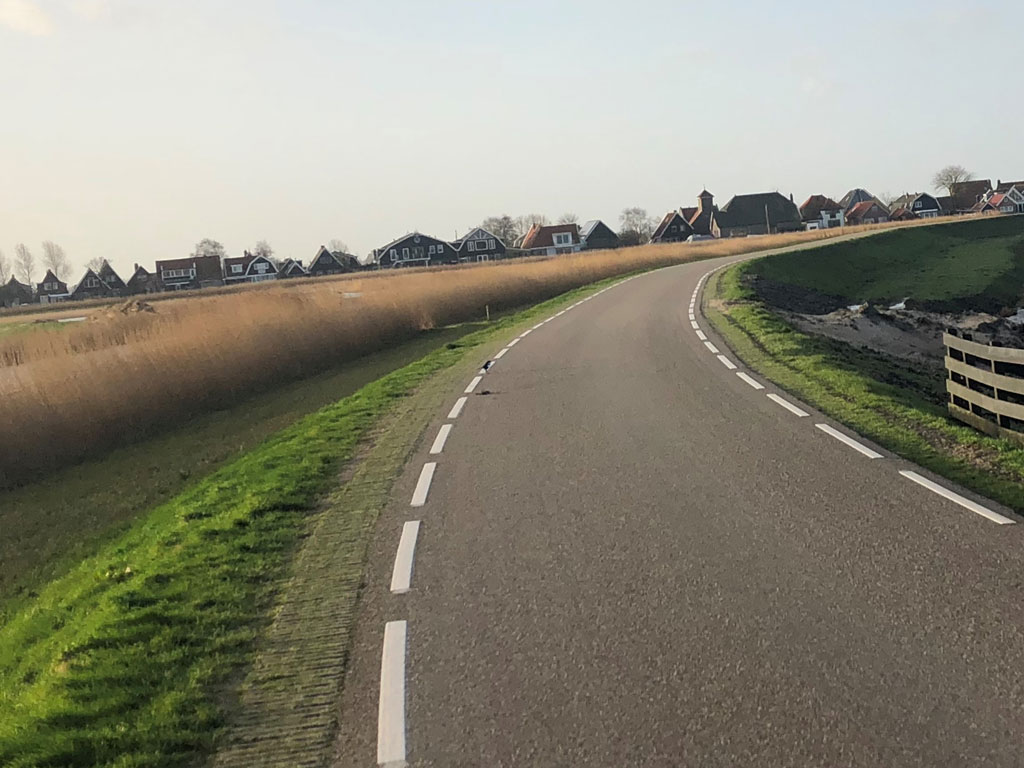
Another first class comparison shot from Frank taken right next to Bovenmolen G on the Molendijk and ahead can be seen Schermerhorn. (RL)
- Capture 63
- 20 Feb 2020

Back in IJmuiden, they head to the end of the quay to find a boat. The Vissersmonument on Sluisplein is concealed with nets, as it wasn't there in 1940.
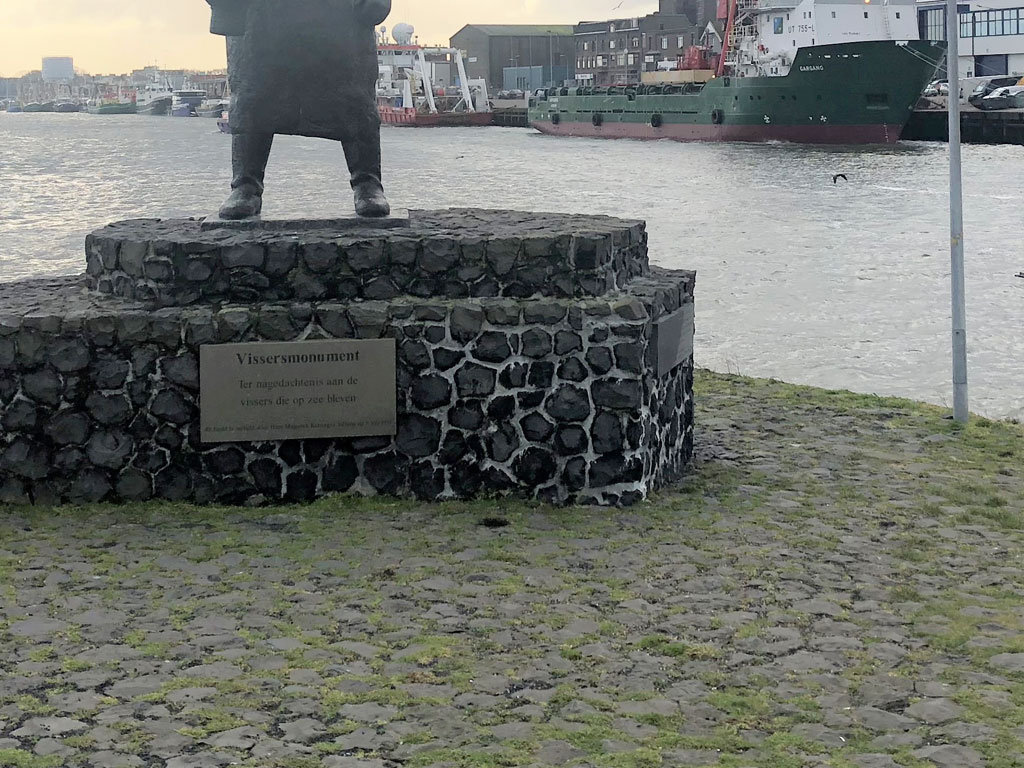
Frank provides this picture of the memorial for all the fishermen who didn’t make it and died on the sea. It was unveiled by her Majesty Queen Juliana on 8 July 1955 and is situated on Sluisplein in Ijmuiden. (RL)
- Capture 64
- 18 Feb 2020

A commandeered tug leaves the harbour to return Dillon, Jan and Walter to the destroyer.
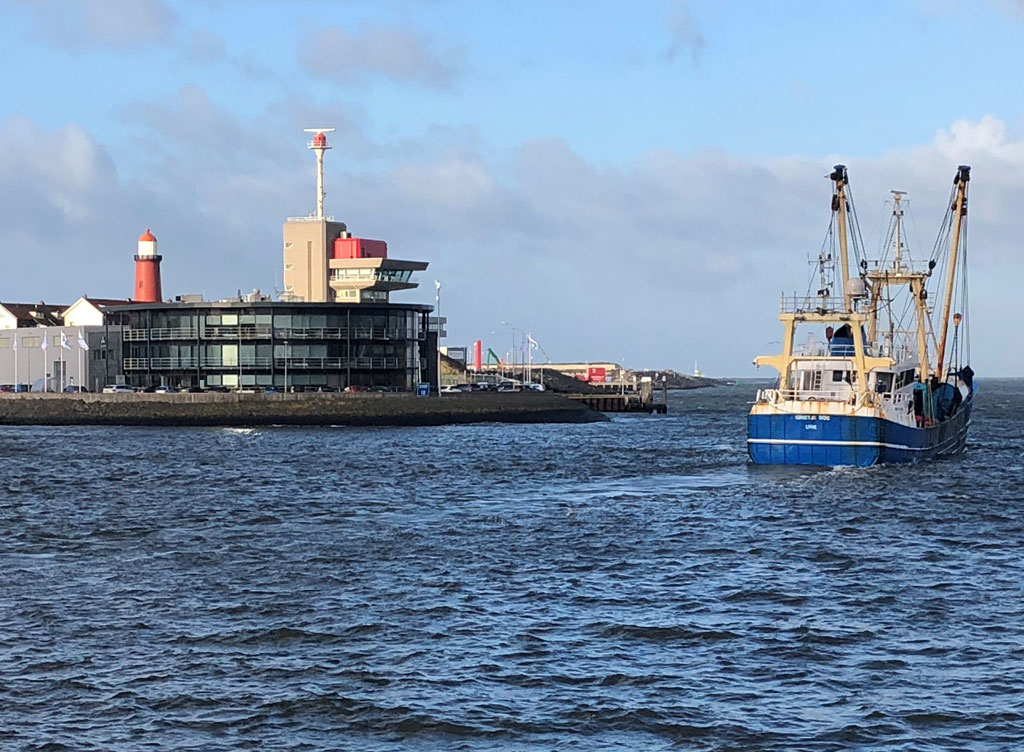
As Frank told us in Capture 4, "We are looking at Forteiland at Ijmuiden. The original shot indeed has been taken from Trawlerkade but nowadays you cannot take the photo from that position because there are too many new buildings. This photo has been taken from Hallkade and gives almost the same view. Left you see the light house called: Lage vuurtoren van Ijmuiden. (RL)